Pages

Wednesday, April 18, 2012

Waz up Wednesday?- Rotating Compost Bin

Waz up Wednesday's is when I talk about a project I've been working on recently. It may still be a project I'm currently working on or one I have recently finished.

To buy a rotating compost bin it can cost you about $100 or more.

I came across this site on pinterest, for a vertical compost bin.

I like the horizontal ones a little better, so we took what we learned from that site and changed a few things.

Here is what we did:

you will need:
(2) 2x6x10 treated wood
(2) 3 1/2″ Butt/Mortise hinges
screws and nuts that fit the hinges (don't use the screws that come with the hinges)
(1) heavy duty latch that can se'curely shut.
screws and nuts that fit the latch (do not use the screws that come with latch)
(1) 1/2" galvanized pipe (we used a 4' one, but you could probably use a 3 1/2' one if you can find it. you will fined this in the plumbing section of the hardware store)
1/2" caps for the pipe
a small piece of 3/4" PVC pipe (we had this on hand from a recent plumbing project)
1 1/2" wood screws
a water barrel (we used an old one that use to belong to my Grandpa. It is a 50 gal. What is important for this project to work with our de-mentions it to make sure the barrel is about 3' tall)

Tools you will need:
saw (handsaw or circular saw will work)
jigsaw
phillip screw driver
pliers
drill with drill bits, philip screw driver head, and hole saw slightly larger then galvanized pipe (I think we used 7/8")
a square
(2) pipe wrenches (you maybe fine with one)
measuring tape
marker of some sort (pencil, marker)
pipe cutter (or box cutter will work)

Okay let's get started...

...first cut the 2x6x10 boards into 3 equal sizes. you should then have 6 boards approximately 3'4" long.


take two of the boards and make a "T". make sure it is exactly center and use the square to make sure it is square. screw together and repeat this process one more time.

You should now have 2 "T" shapes. turn them so they are upside-down T's and take the two remaining boards and line them up like the picture shows.


your stand should now look like this.


Drill holes with hole saw about 2" down from top of wood post and exactly center.

On to to the barrel...

find exact center of the round ends of the barrel. This was pretty easy sense there where two seems that met up in the center. Using the hole saw drill a hole on each end.

for the door you want to first mark out where you want it. we just looked for seems or lines in the barrel to mark where we wanted it to be.

After it is marked use the drill head to make holes in the corner large enough to get your jigsaw blade in.

Saw the sides of the door that the latch and hinges will be attached. (DO NOT saw the other two sides yet)

lay the hinges where you want them and mark the holes. drill starter holes on those marks.

screw the hinges on. Do the same process for the latch.

Once the hinges and latch are screwed on proceed with sawing the remaining two sides of the door.

Open the door. using the pliers and screw driver tighten the nuts to the bolts to fully secure the hinges and latch.

Take the PVC pipe and cut two 1" pieces off, using pipe cutter or box cutter. A saw may work as well.

Here is the tricky part. you will want to take the galvanized pipe and put it through one of the wood post, then a PVC pipe, then through the barrel, through another PVC pipe and through the other wood post.

once you've done all that you will want to put the caps on the end of the galvanized pipe, using the pipe wrenches.

You made it! You are done!

now find a spot for it and start saving all those food scraps and grass and you will have nice compost in no time!

Friday, April 13, 2012

Food Friday - Graham Crackers


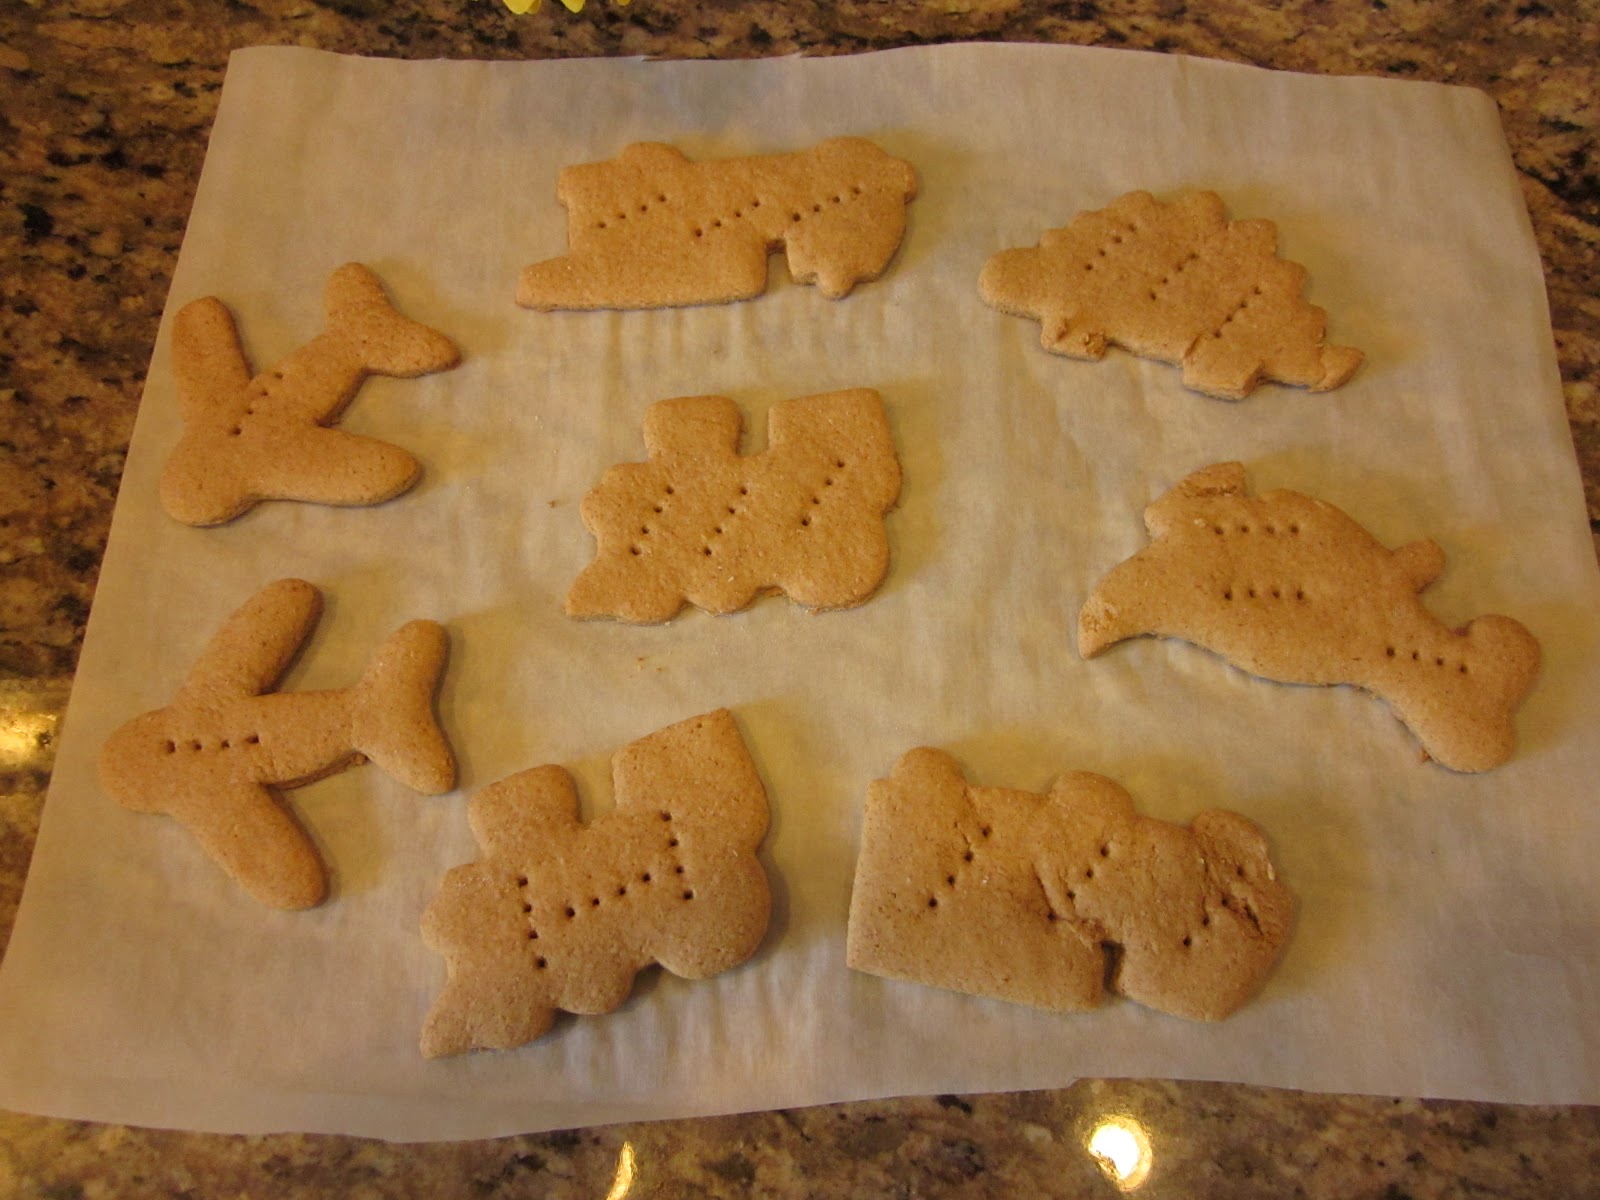
So this was my attempt to give my kids Graham Crackers in a healthier way.

I say attempt because even though we all liked them, they didn't fall apart in milk like my boys love.

It was fun to have any shape Graham Cracker you like.


Home-made Graham Crackers

2 1/2 Whole Wheat Flour
1/4 C agave nectar
1/2 tsp. salt
1 tsp. baking soda
1 tsp cinnamon
1/4 C oil
2 T honey
1 T molasses
1/4 C water 

add all to a food processor or in your mixer with a bread hook. Mix until it forms a ball. Roll out on floured surface until just thinner then regular Graham Crackers. cut with your choice of cookie cutters or a pizza cutter into squares or rectangles. transfer to parchment covered baking sheet. Bake at 350 degrees for 11-14 min.

Wednesday, April 11, 2012

Waz up Wednesday? - Lego Floor Bags!

Waz up Wednesday's is when I talk about a project I've been working on recently. It may still be a project I'm currently working on or one I have recently finished.

My boys got Legos and Duplo blocks for Christmas this year.

What a pain in the butt to clean up!

not to mention all the times the vacuum go over them.

Dear Santa,
It was so great seeing my boy's faces when they opened the Legos you brought them, but now my vacuum is unhappy. So for Christmas this year I'm asking for a new vacuum! 
Thanks, A Mom 
P.S. after all it's your fault!

My boys hate cleaning them up also.

I'm sure you have seen these around and I even saw some for sale for about $64 (Eeek!)


I've also seen some cute ideas of putting each lego color in it's own bin.

Maybe my kids are not normal, but all I thought of when I saw that was..."Those bins will just be dumped out and mixed together in a matter of seconds."

Talk about a bigger pain when it comes to cleaning up!

I like the floor bag idea, yes some of the legos do manage to wonder off the bag, but over all they are SOOO much easier to clean up!

No more using a dust pan to scoop them up over here (yes, it's true, bigger surface area then my hands meant faster clean up! don't judge!)

I used 6 (3 of each color) yards of fabric. some cotton rope and eyelets.


The rectangle one I don't like as much. it does give a larger area to play, but not as easy to pull together.

The round one is AWESOME!


(I apologize now for not taking photos of the process, I hope words will be enough)

So I took the three yards of fabric and folded it in half and cut down the fold.

Then sewed them back together side by side. (I hope this makes sense)

Cut it into a perfect square. ( I am planning on using the extra fabric to make other bags or pillow cases for their rooms)

then take some butcher paper, string, and a pencil. Divide the squares length in half and cut the string to that length.

Tie the string to the pencil. holding one end of the string, draw with the pencil, at full length, a quarter circle on the paper. cut along the pencil line.

Fold the fabric square in quarters and pinned the paper to it (make sure the rounded edge is away from the folder parts of the fabric). Then cut along the rounded part of the circle.

Unfold the fabric and you have a circle my friends!

Do the same for the fabric you want to use for the inside.

On the outside fabric, find a spot along the edge (about an inch or 2 in) to put your eyelets (make sure they are big enough for your rope to go through.) Put two about and inch or two apart from each other.

Okay now you can sew the two parts together, make sure you leave several inches to flip it right side out again and then sew that part together.

Now you will want to sew another line about 3-4 inches in from the side, all the way around. making sure that the eyelets are in between the edge and the new line.


weave the rope through the eyelets and around the edge of the bag, making sure there is enough to allow the bag to lay flat. tie a knot and you are done!

Thanks for stopping by!

Friday, April 6, 2012

Food Friday! - Multigrain Pancakes

On St. Patrick's day I wanted the kids to have a fun holiday.

Growing up we would dress in green and have food colored green.

I've tried this in the past and my kids would not eat "green food". honestly it doesn't look too good to me either!


I decided to go with normal food, food I knew they would eat.


I told them the pancake was a large gold coin at the bottom of the rainbow.

I made a green smoothie using extra fruit I didn't put on the plate, an avocado, spinach and some milk.

Now for the multi grain pancake recipe. I revised this from a recipe I got from my sister-in-law.

Multi-grain pancakes

1 C oat flour (grind oats in food processor)
1 C whole wheat flour (I use whole wheat pastry flour)
1/4 C ground flaxseed
2 tsp. baking soda
1tsp. baking powder
1/2 tsp. salt
6 Tbl. chopped nuts (optional. you can choose one or many different kind)

mix above ingredients in a medium sized bowl and set aside.

about 1C or 1/2 pint of buttermilk
1 C milk
1/4 C oil (I use apple sauce as replacement sometimes, if you do make sure you watch them closely so they don't burn)
2 eggs
1/4 C sugar (you could use honey or agave nectar as well)

mix wet ingredients with an immersion blender or electric mixer. you want it to get slightly fluffy. Add the dry ingredients and mix by hand until just combined. Cook on skillet just as you would other pancakes.

Other recipes I've tried and liked:

best pizza crust recipe!

cashew no chicken

Wild-rice stuffed squash

Wednesday, April 4, 2012

Waz up Wednesday?- Garden

Waz up Wednesday's is when I talk about a project I've been working on recently. It may still be a project I'm currently working on or one I have recently finished.


source

 I grew up in a family that always had a garden, a pretty large one most years.

I learned a lot about gardening and have lots of great memories of working in the yard as a family.

Me at about age 3 with our 40lb squash
I realized lately that I didn't learn as much as I thought I did. Or maybe it just didn't stick in this head of mine.

Thank goodness for the internet and Pinterest.

Now that we have a yard and are not trying to grow plants out of planter boxes. I'm realizing how much work and how much cost a garden really takes.


I'm sure some can do it a lot cheaper then we are doing. We decided to do the square foot garden thing. or our own version of it anyway.

I liked the look of raised box gardens with the gravel paths around them.

My dream Garden.
source


We also needed a way to keep the kids and dog from digging in it. so we have put a fence up around the whole thing.

I think the white picket fence is going to have to wait.

Our puppy(?), Neville, loves to chew on EVERYTHING and bury things.


We gave him a stuffed penguin for Christmas.


The next day it was nowhere in site. We thought we saw stuffing and blue fabric as the remains until this week...

as we were tilling up the dirt we had a few surprises pop out of the ground (besides the ass-fault that was just covered up by top soil)  several dog chew bones, ripped up dog blanket, and the penguin, still in one piece.

the previous owners had put in curbing all around the out side. We really liked it...at first.

 When we started writing down what we wanted in the yard and trying to figure out where to put it all. The curbing had to go...or at least move.

SO we have fenced in the area (okay maybe the post are only up) where we wanted the garden to be. We've been moving some of the curbing a few feet, digging up grass, moving dirt around to make a flat area, and praying we would not dig up or need to move any sprinklers (we don't, at least not this year.) 


We moved some of the grass we dug up to the side of our patio where we were thinking of putting cement until we looked into the cost. The sprinklers do not cover that area, so we will have to use a hose with sprinkler head. It is only temporary until we can get some cement in there.


Monday, March 26, 2012

quick veggie burger

I really liked these. they don't take any longer then regular burgers to make and they are a lot less messy.

no grease splatters all over the stove.


 I've tried veggie burgers from the store years ago and didn't care for them, too chewy or something.

I have changed my ways.

this is the way to go for veggie burgers. of course I will still be enjoying a real burger now and then.

1 can black beans (drained and rinsed)
2Tbl. katchup (or you can use tomato paste for a no sugar option)
1tsp. mustard
1tsp onion powder
1tsp garlic powder
1/2 cup oats ground to a course texture
1Tbl. Worcestershire sauce

add everything in a bowl. mix and smash beans until it is well mixed and a ground meat texture. make into patties. cook like you would meat patties or bake in oven at 400 degrees for 7 min on each side.

Monday, March 19, 2012

Meatless Shepard's pie

I adapted these from a recipe of veggie meat balls.

It really gives the meaty texture.

I normally do not make such time intensive meals, but every once in awhile I will do it.

I will normally make twice as much as we would eat and freeze part of it for another day. (split it before you cook it)

4-5 medium sized potatoes
1 C lentils
1 small onion
1 carrot, chopped
1 celery stalk chopped
1 tsp minced garlic
1Tbl. Thyme
1tsp. salt
1 small can tomato paste (6oz, I think)
4 oz of mushrooms diced
1 bag frozen green beans

clean and cut up potatoes and boil them for about 20 min. add lentils in a quart of water. bring to a boil then turn to low and simmer 20-25 min. saute onion, carrot, celery, garlic, and mushrooms. add cooked and drained lentil, salt, thyme, and tomato paste to the veggies and mix well. it will be thick.
add the tomato mixture to a sprayed casserole dish (i did a 2 quart dish, but it will probably work in a 9x13 dish). layer the green beans on top of the tomato mixture. smash up cooked potatoes (you may want to add veggie stalk or water to give them some moisture) layer the potatoes on top of the green beans. bake at 350 for 30-40 min.